
How to choose a tripod for food photography

It can take some time to be convinced of the value of using a tripod for food photography, but once you get to grips with it, you will never look back. Finding the best tripod to suit your workflow and budget will become a top priority and the options can be overwhelming. This guide will help you to make the best choices.
First, a little disclaimer. I’m currently not contracted as an ambassador of any equipment brands, so my opinion is unbiased. Having said that my knowledge of available options is not exhaustive and I can only share recommendations based on what I’ve personally used. If you have experience with other options that have rocked your world, I’d be very interested to hear about them.
Here are my top 8 considerations when purchasing a tripod for food photography.

1) Cost
Once you have reached the point that you know you need a tripod, it is worth your while to buy the highest quality tripod that you can afford at the time. A tripod isn’t like a camera or lens. It doesn’t have software that will become obsolete or multiple new ‘essential features’ appearing on each new release. It can be dropped a few times and not break. It is likely to be something that you will continue to use for years and years so it can be considered an investment piece.
The most important thing to be aware of is that there are countless super cheap tripods that I can guarantee will become a bin item within weeks of purchase. It shocks me a bit when I see how low quality some of the tripods my students have purchased are. I can honestly say that a large proportion are not fit for purpose. My advice, save your hard-earned dollars and buy something that will endure.
As a rough guide, you can expect to spend at least a few hundred dollars to get a decent tripod and head.
2) Weight
Weight is a significant consideration when it comes to buying a tripod. There is a big difference between the kind of tripod you would buy for travel and adventure photography versus what you need for food photography. For the former, you would aim to get something as light as possible, while maintaining stability. You might even choose an option that includes foot spikes that you can embed into the earth to help retain position.
Most food photography is done in a studio or indoor environment. The majority of shots are quite close up and slow shutter speeds are important, so having a solid tripod that doesn’t knock or wobble easily is key. It’s unlikely that you will be lugging your food photography tripod for long distances attached to a backpack so you can afford to go for something heavy and durable.
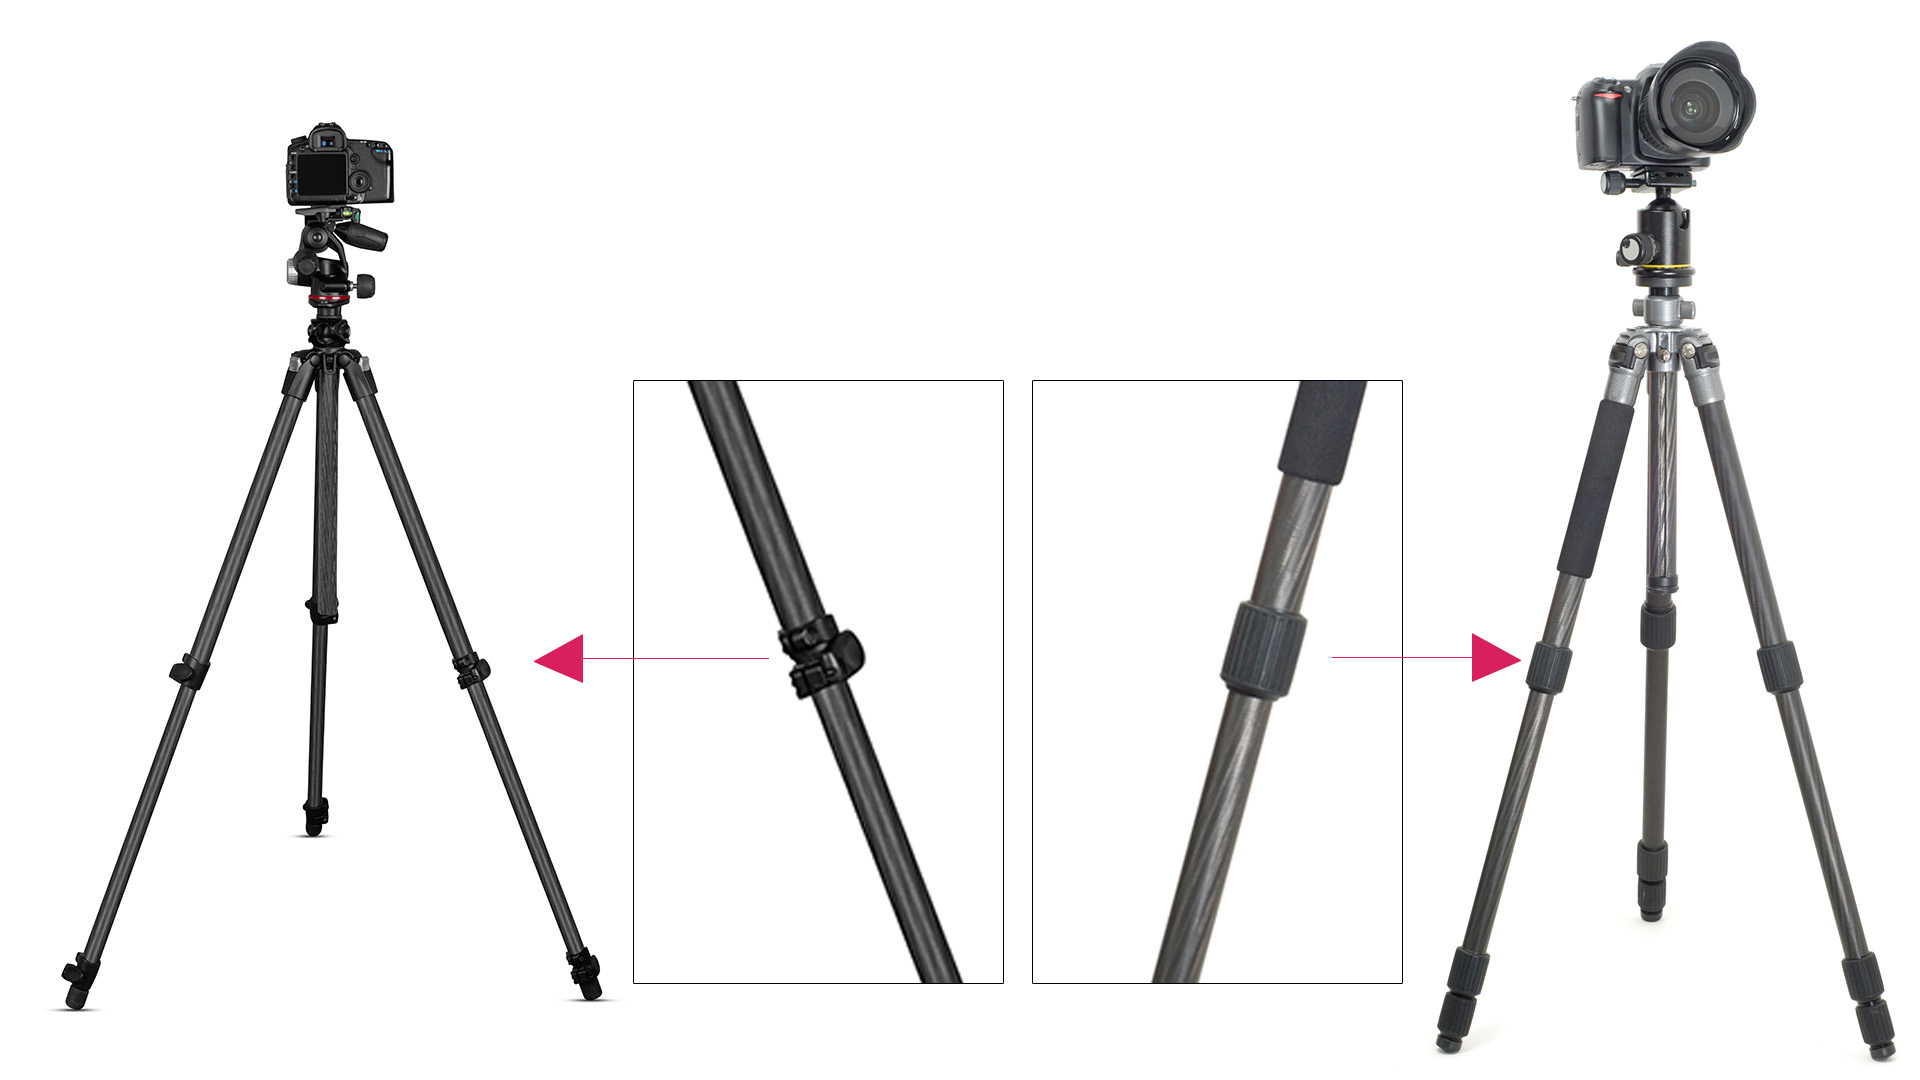
3) Leg locks
Leg locks are the connectors between each section of the legs, that allow the legs to extend and then lock into your selected position. There are two main types. Twist-leg locks open and close with a twist, with the compression becoming tighter with each twist. Flip locks are a flap that creates a tensioned compression on the leg when it’s closed.
Crappy leg locks are THE most annoying thing ever. Tripods are awkward and cumbersome at the best of times. Grappling with leg locks that malfunction is enough to make you want to throw the tripod through a window!
You will find people that will argue for and against both kinds. For me, twist locks are in my ‘hate’ basket, for two main reasons. I seem to have more strength for tightening than opening and I have on many occasion been unable to open twisted leg locks that I have closed. (This isn’t an isolated occurrence. It extends to all twisty things in my life, including jar lids, gas canisters for soda stream, etc etc).
Download a FREE chapter of my ebook 'The Ultimate Guide to Natural Light for Food Photography' by adding your details here:

My tripod shopping recommendations:
I only recommend what I use, or have used myself. In my opinion Manfrotto is ‘king’ in the tripod world. Tripods last decades so they are worth the investment.
1) My top choice tripods/heads:
2) Lower budget options:
3) Overhead options:
Secondly, I live in a beachside area – and there are often (more than) a few grains of sand in my car boot. Twisty leg locks do not like sand. At all. One tiny grain of sand in a twist leg lock can, at worst, render it completely useless forever (unless a kind muscular person is willing to twist it open and closed endlessly until the sand is so worn down it becomes dust), or at best, make a nasty grating sound that makes you grit your teeth every time you open and close it.
My preference is definitely flip locks. Having said that, cheap flip locks can be totally useless because they sometimes lose the tension that they need to hold the leg in position. Imagine that you’re lining up the perfect shot, and you naturally lean gently on your camera as you check the focus point. Suddenly you notice a gradual sinking feeling… yup, that’s the cheap flip lock failing.

Ball Head

3 Way Pan & Tilt Head
4) Head
Once you move past the cheapest options for tripods, you will normally need to choose your tripod legs and tripod head separately.
There are three kinds of heads relevant to food photography, ball-head, 3-way pan & tilt head, and geared head.
Ball heads are the cheapest of the three. You can start here and work your way up if you’re short on cash. The annoying thing about a ball head is that when you want to make a micro change to the position, it will often make a major movement and you’re back to square one with aligning again. This problem is magnified the heavier your camera is.
I love 3-way pan & tilt heads. These heads come with a number of handles that allow very precise micro-movements and re-positioning on each plane of view. The only major downside is that you will likely be paying a few hundred dollars just for the head.
Geared heads are like a fancier pan and tilt head. Instead of a handle that you manually position, the knobs on a geared head have a mechanism that ‘powers’ the movement, making it even more precise. To my mind, this is an extra fancy feature that, while attractive and allows for ultimate accuracy of positioning, is non-essential for food photography. You’re also likely to be significantly out of pocket buying one of these.

5) Quick release plate
The majority of good quality tripod heads offer a universal style quick release plate that attaches to the bottom of your camera, so you can just pull a lever on the tripod housing and the camera is freed. It’s ideal to find the kind that has some sort of secondary lock so that the quick release plate doesn’t spontaneously propel your very expensive camera off the tripod legs when you haven’t attached it properly. It also helps those of us who don’t always double check to see if the plate isn’t properly secured in place because it’s apparent that the lock-lever isn’t in the ‘closed’ position. A built-in bubble level is also a common feature on the quick release plate or head of many tripods.
6) Height
There are two types of food photographers when it comes to overhead shots. Those who like to go HIGH over normal height tables and dangle off ladders to get their shot. And those of us who like to go LOW and spend a lot of time on their knees, using coffee tables, or milk crates with boards placed upon them as their shoot surface.
Whichever camp you lean towards will impact upon how high you want your tripod to be able to extend to. Since I am one of the knee dwellers (to the point that I put my knee through three pairs of jeans in one month and have now invested in a pair of (life-changing) dancers knee pads) having super-height tripods isn’t that important to me. A standard three section leg reach is usually enough.

7) Multi-angle leg locks
If you like to shoot low rather than high, something that will be of interest to you is multi-angle leg locks. At the top end of your tripod legs, where they connect to the central column (where the head lives), there is usually a limit on how far the legs can bend upwards on a standard tripod. With multi-angle leg locks you can bend the legs all the way up to a 90-degree angle which means your tripod can sit as close to the floor as you would possibly like it to.

© Fran Flynn for Bhavana Cooking School
8) Overhead shooting
Speaking of overhead shots – this is where it gets tricky with tripods. How do you get the camera stabilised in the right position for overhead shots?
There are a few options. Most options work well enough for light cameras. If you have a heavy professional camera like mine, with a battery pack attached, things get a lot more complicated because the weight of the camera comprises the effectiveness of the majority of the options.
Want to know THE best lighting angle for food photography that works every time? Download my free cheat sheet by entering your details below:

Lateral arms
You can buy a light stand and attach an extension arm or buy a lateral arm attachment for your existing tripod. In this case, you just remove the tripod head and replace it with the lateral arm. Then you counterbalance the weight on the opposite end of the arm to your camera with a photographers sandbag. The downside is that they can tumble over quite easily if the weight balance ratio isn’t exact and the legs of your stand aren’t well positioned. Depending on the quality and reach of the extension arm, they can also have a tendency to bounce easily, creating micro movement in your images.

© Fran Flynn for Kiwi Cafe
Centre column lateral arm
You can buy a tripod with a central column that can be re-positioned from vertical to a horizontal format. Again a sandbag would be used to counterbalance the camera. This is a good beginner option but there are some drawbacks also. 1) the arm is often not long enough to extend far enough in a lot of situations. 2) you will have to be a knee dweller! The tripod legs generally don’t extend high enough to allow you to take a shot over a standard table with the horizontal arm position, so you’ll need your shot surface to be much closer to the floor. Even when you take this approach sometimes it still won’t be high enough to take in the full area of the shot, depending on what lens you have available to work with.

C-stand
You can use a c-stand rather than a light stand or tripod and add a lateral arm and camera grip. This is a solution that many professional photographers go for. The c-stand is substantially more stable than a tripod style light stand. They usually extend quite high and you can buy a long arm to extend over your table. Downsides are that it tends to be costly to buy a high-quality c-stand, and they are cumbersome for storage and transporting. Also, once your arm is extended properly over your table, you’ll likely need to do a death-defying balancing act to see the screen of your camera and make adjustments, so you probably need to go ‘next-level’ and shoot tethered to a laptop. This means that you buy a special tethering cable and use software (that comes with most SLR cameras) on an off-camera computer to manage the settings in your camera and take the shot. This is a good option but it is another thing to learn and not an ideal beginner scenario. I’ll be talking more about tethering in a later article.
What I use
Personally, I’ve actually come up with my own piece of equipment that overcomes all the issues that I’ve had with overhead shooting. I’ve had a raw prototype produced and I have been happily using it in my daily work. Now I’m in the process of patenting the design and getting commercial prototypes produced. Watch this space for more news when it becomes available!

© Fran Flynn for The Fish House Burleigh
Brands
Finally, the question I’m always asked is what brand should you buy. It’s hard to get past Manfrotto. They are pretty much king in the tripod space where I live. Vangard is also a very well-known player. Sirui is also well worth a look. There are lots of other brands worth considering that I don’t have first-hand experience with including Dolica, Induro, Gitzo. Neewer is also disrupting the market with economy-priced high-quality equipment. I’ve been happy with a few other pieces of equipment from Neewer but I haven’t tried their tripods yet, so I can’t vouch for the quality.
How about you, do you have a favourite tripod? I’d love to hear your experiences in the comments below.
(Extra images in this article ©istockphoto)
Hi, Fran here. I believe in transparency & making small-print fun, so you should assume that every Amazon link on this blog is an affiliate link, which means if you click it and buy something, I’m going to make a tiny amount of money in the form of commission, at no cost to you. Now, before you feel hoodwinked, please bear in mind I've been slogging my guts out for over 20 years to develop the knowledge to write this insightful content for you (you're welcome!) and I don't get paid to do that. Instead I forego Netflix and sleep late at night, not only because I'm highly motivated to save you from at least some of the horrible mistakes I made over my career (for real), but also in the vain hope that some day my blog will go viral and I can fund an early retirement from these cumulative miniscule affiliate payments. Enjoy!
You might also like:


Hi I'm Fran, a professional photographer and designer based on the Gold Coast in Australia. I’m a lifelong creative, passionate about producing drool-worthy images that provoke emotion and make you hungry!
My obsession is teaching others how to achieve the satisfaction of realising their creative vision too. I also love to produce high quality visual books (especially cook books) for my clients.