
Improve your food photography overnight without spending a cent

Photographed for Balthazar Wine & Dining, Crowne Plaza Surfers Paradise
The first step to photographing food beautifully is to have the right tools. Of course, you need a camera, but what else? In my opinion, there are 3 additional essentials; a tripod (regardless of whether you are using a phone or an SLR), a diffuser and a reflector.
"Great," you say as you head to the door with your keys in your hand, ready to max out your credit card at the nearest photography shop. But before you swap your next holiday for a lot of expensive kit, let's consider what you can use in your home environment first.
A diffuser is a fancy term for something semi-transparent that will reduce the intensity of the light that's coming through your window and hitting your subject (aka food item) and in the process softening the shadows.
Soft shadows are almost always preferable in food photography unless you're deliberately choosing to create a hard shadow look (which tends to take a bit of skill). There are a variety of relatively inexpensive professional diffusers on offer, however, did you know that a standard white bed sheet can take on exactly the same job?

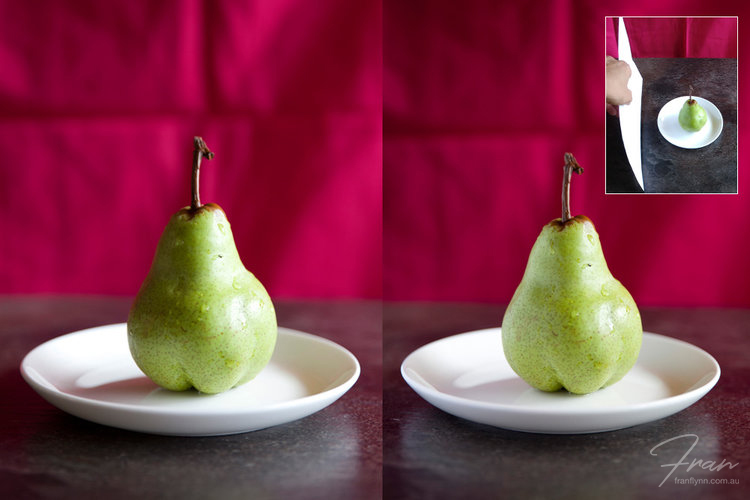
This shot has been taken on auto mode. You can see the right side is overexposed.

This shot is identical to the left hand shot EXCEPT a white sheet has been hung infront of the window, diffusing the light and solving the overexposure problem.
In fact, anything that has a semi-transparent quality is a contender. Baking paper stuck all over your window can have a lovely softening effect on the light coming through. Tissue paper or even kitchen paper towel (for selective areas of additional diffusion) are also useful.
If you decide to trial fabrics like bed-sheets, differing thread counts will have a greater or lesser effect depending on the thickness of the material. That means if you'd just like to soften the light by a small amount, fabric intended for net curtains can work. Similarly, cheese-cloth has an open weave and will have a low impact effect. Conversely 800 thread count Egyptian cotton sheets could have quite a strong impact on the light source and soften the intensity of light considerably.
It's worth experimenting with a variety of different fabrics to to understand the results you can achieve with different intensities of diffusion.
A reflector is designed to bounce light from your light source into the shadow side of your subject (i.e. the opposite side of the subject (food item) to your light source). Reflecting light into the shadows brightens those areas and creates more detail in the shot. This is ideal if you're after a brighter look.
Left image is a straightforward shot on auto mode, with window light from the right side. The righthand image has a white board reflecting light into the shadow areas on the left side. Can you see how much brighter the left side is? (Inset image shows the white card in use)
However, you might instead prefer to deepen the intensity of your shadows to create a moodier vibe. In this scenario, you can use a black reflector which will accentuate the darkness of the shadows.
Download a FREE chapter of my Book 'The Ultimate Guide to Natural Light for Food Photography' by adding your details here:

Again there are plenty of commercial options available but basic pieces of white (or black) card are super effective reflectors. It can be quite surprising just how much light will bounce from a piece of card. I like to stick two pieces of card together loosely on one edge, so if you position them in a v-shape (like a half-open greeting card), they will support each other when placed upright on a table.
There are many other things that you can experiment with for reflecting. A mirror will create a strong and very directional reflection. Consider trying a variety of reflectors, e.g. a silver car windscreen sun shield, large and small mirrors (small mirrors are great for adding a highlight in a selective part of the images), different sizes and finishes of card boards, e.g. white and silver.

Note how in the image on the left, the removal of the white plate has reduced the reflections on the base of the pear. The image on the right has a red relfection on the left side of the pear, courtesy of a small red shopping bag (inset)
You can also experiment with coloured reflectors. It can be quite surprising to see how much colour will be transmitted from a coloured item onto the subject. For example, a gold reflector is often used to 'warm' the mood of a shot. Above you can see the impact that a small red bag has, acting as a reflector.

Styled by Sarah DeNardi
Unfortunately, a tripod isn't as easily emulated with household items. Of course, all you need is a stable surface at the height that you'd like to shoot from - but what happens when you want to adjust your height and/or position? Or you want to shoot a portrait format portrait rather than landscape. I will concede that it's definitely worth spending some money here. In my opinion, particularly for food photography, I'd suggest buying the best tripod you can afford. Ultra cheap tripods are next to useless. They are simply not stable enough plus they tend to have very tedious methods for extending and contracting the legs.
It is very useful to have a tripod for food photography, for a couple of reasons. Unless you have the ideal window position and size, more often than not, the lighting isn't actually strong enough to shoot without a tripod - i.e. you need to use a low shutter speed to let enough light into the camera. If you were to hand-hold in this scenario the natural micro-movements of your body would create camera shake, which would result in a blurry image.

In the image on the left the background has been shaded with a piece of black card, which makes the pear stand out more. The light is obviously very strong at this moment and is too bright on the right side of the pear.
The image on the right side also has the background shaded with a piece of black card. The light source is diffused with a white sheet and a white card reflector is positioned on the left side, which softens the shadow on the left side of the pear. Note the unexpected affect it has had on the auto white balance (i.e. the background looks a lot redder than the pinker previous shots).... white balance will be a topic in a later blog
Secondly, when you are creating your perfect food photography shot, there are so many elements to consider. Selecting your your camera angle and then locking it into that one spot on your tripod will help you focus all your energy purely on composition, which helps to reduce the likelihood of 'overwhelm'. Presuming there is enough light in your environment you can always go 'off tripod' and experiment from different angles once you've bagged the money shot.
If you're interested in finding out more about tripods and specifically which are the best for food photography, I will be sharing an article on this subject soon.
You might also like:


Hi I'm Fran, a professional photographer and designer based on the Gold Coast in Australia. I’m a lifelong creative, passionate about producing drool-worthy images that provoke emotion and communicate deliciousness. My obsession is teaching others how to achieve the satisfaction of realising their creative vision too. I also love to produce high quality visual books (especially cook books) for my clients.